

Installing Your Mobile Barcode Scanner
If you purchases the scanner from one our preferred vendors, your barcode scanner may be been preinstalled with the Finale Data Collector software. If you purchased the scanner somewhere else, you will need to install the software before you can sync data back and forth. This video shows the process of installing your mobile barcode scanner using our software.
See the video below for instruction:
Installing Your Mobile Barcode Scanner
(Videos: See complete list of available videos)
Video Transcription
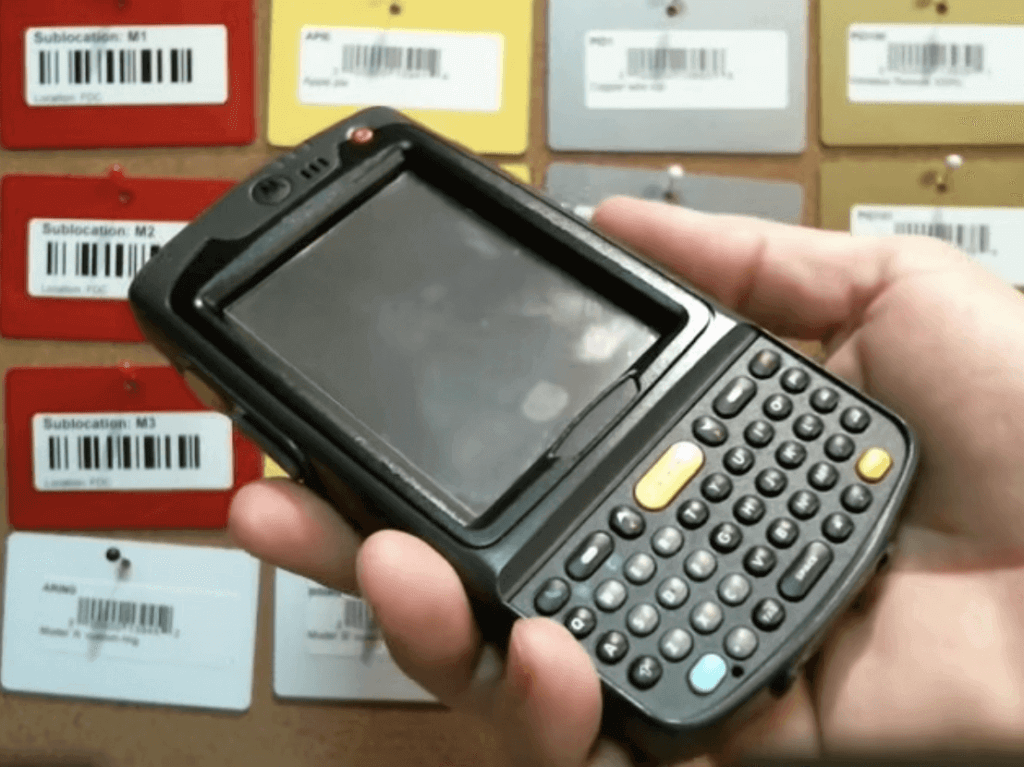
Hello. This is Mike with Finale Inventory. In this video, we will be installing your mobile barcode scanner on your computer. We’re going to get the Finale Data Collector software, download it from our website and onto that handheld. And we’re gonna get it all integrated together and set up and ready for you to use. So, where we start with this is log into your Finale Inventory account and get to your home screen. And we’re gonna go ahead and show you kind of what we’re talking about. So, the mobile barcode scanner, I’m gonna see if I can bring this up to you, you buy that from one of our partners and we will send you links to get to that. So, once you get it, you may get it from them and it kind of looks like this with…when you get it out of the package. So I’m gonna show you how to set this up and get it interacting with your computer.
So, first thing’s we need to put the battery in. So, they may ship it without the battery normally. So, I’m just gonna show you, the battery has a tab on one end. So you can kind of see the tab on this end and there’s no tab on this end. So just simply put the end with the tab towards the bottom of the device and snap it in. So, that part’s easy. And then you’re gonna see the cover. The cover has these little wings on them or little latches. So, we’re gonna put the bottom of the cover on first. So, we put the bottom on the cover first and then make sure the little tabs are pressed out and we’re just gonna press it in. So this can kind of be a little bit difficult. And once you get it pressed in, just turn the two tabs down and you got your power to the handheld all connected up and it’s ready to power up. So to power it up, just simply press the red button and it should light up and give you to the windows home screen.
So, the next piece to this is you should’ve gotten with your scanner a USB cradle. This will plug into the bottom of the unit for connecting it to your computer and it also provides the power to charge it. So the other end of this cable looks like this. So it’s a USB connection with also a power injector. So this is where the power adapter goes so you can actually charge the unit. So you’ll wanna take that step and get that charger cable and go ahead and plug it into the Y so that now you have power available to the unit. So the next step you wanna do is to take your USB connection and plug it into your computer. I’ll do that now. And we’ll get that into a free USB port.
And then I want you to notice that now we’re ready to actually connect it to the computer. So we’ll just simply connect it to the cradle, okay? So we’ve plugged it in. And now this is going to fire off your drivers in Windows. So windows right now, it’s gonna load up the drivers. So, I’ll show you kind of what that’s going to entail. But Windows…this is an 8.1 machine, so it’ll be very similar on Windows 7. But at the moment, the computer should be loading the drivers for it. In the background sometimes it’s hard to see but you may see sometimes some driver loading activity here in your system notification area.
All right. So you probably heard Windows recognize that the USB was plugged in. So, right now it’s kind of…should be in the background loading up the program called Windows Mobile Device Center which is gonna load the Windows drivers. Once that gets loaded, it normally fires off. So, I believe Windows has actually loaded in the drivers. So the next step that we need to do is to actually connect to the handheld unit. So we’re going to go to, first, to add the integration to your account. So we’re gonna go to add-ons and integrations and you’ll notice that by default you may not have any integrations here. So, you need to go to the action menu and choose install mobile barcode scanner integration.
Now, once we get this integration installed to your account, you’re going to go to the barcode scanning screen. So, you can get there from this link here but it’s also the same, it’s just going to the home, we’re gonna go to barcode scanning. So once we see the barcode scanning screen, this is where we’re gonna actually connect to the mobile scanner and we’re gonna use this connect to dock mobile scanner. Next, the browser’s gonna inform you that you need to install a Finale Inventory Chrome extension which is a program that runs in the Google Chrome browser and it will interact with another program that we will download the Finale Windows application. So let’s go ahead and install that. It’s gonna ask you to add the extension to Chrome. We’re gonna go ahead and add it and you’ll see that the extension has been successfully added to your Chrome browser.
Next, we need to download the actual Finale Inventory Windows application which is gonna talk to that extension. So, we do that just by simply clicking on this link and it will download in your browser. Now, you will see this…sometimes you might get a warning here that says it’s not a commonly downloaded program. That’s okay. Just click on this little arrow here and say keep. And once it finishes downloading, you can click on this to actually run it and then the Finale Inventory setup wizard will run. So now we just need to take the defaults. You can now choose for everyone if you’d like and hit next, and run through that. You’re gonna get a little warning from your computer for user account control. It’s okay. Say yes. And that’s as simple as it was. So, you can see that we’ve been successful in installing all the necessary programs to actually get it to work with your computer and get it to interface with our browser application.
So, the next step is to actually connect the device. We’re just going to use this button here that says connect to pocket PC. Once we connect, you can see that the browser is telling you, you need to update the actual scanner software which is what we call the Finale Data Collector. So, this first green button is actually gonna download the Finale Data Collector software to the handheld device. So, let’s go ahead and update the scanner software. That’s actually loading the actual software that runs on the handheld. So now that we’re successful, we just hit continue.
The next button you’re gonna be presented with is the button to download all of your accounts, your product IDs, your stock levels, your purchase orders and your sales orders and so on. So this is actually gonna download that to the handheld itself. So, we press that and we let it do its thing and we are done. So at this moment, we have successfully connected the scanner to the computer. We’ve installed the Windows drivers. We’ve connected it to the browser. We’ve added the Google extension. We’ve installed the Finale Windows application that actually talks to the browser. We connected to the handheld itself. We installed the Finale Data Collector software on the unit itself and we’ve updated the data from the Cloud that actually lets the scanner know all about your inventory.
So, there’s another critical piece that we need to address to get this handheld ready for you to actually use, and that’s right here in the action menu. We configure the data collector integrator and we’re gonna set what happens to when you do actually sync data from the handheld back to the Cloud. So, if you use the handheld to do a stock-take or a pick or add stock or do a transfer when you actually complete that, you actually have to connect and synchronize. This screen here is going to set what happens to those transactions. By default, they’re all set to draft. So, we’re gonna set these to a preference so that when you synchronize, there’s no more action that you need to do. So, if you wanna leave it in draft, you can but that means you’ll have to go through a specific transaction and actually approve it. But I’m gonna go ahead and set these to actually commit them. So, we’re gonna set the purchase shipment to be received. We’re gonna set the transfer shipment to be received. We’re gonna set a sale shipment to be actually shipped and a return to be received. Stock-takes, we’re gonna commit them. Stock adds, we’re gonna commit those and stock changes or subtracts, we’re gonna commit those.
So, now we have successfully set how the scanner is going to interact with the Cloud once we do a sync. So I wanna show you moving on to the actual handheld itself, so let’s say we’ll now that you’ve actually installed some software let’s see what will we do with this. So if we wanna see what we’ve done, we’re gonna actually take the stylus out here and we’re going to go to the Windows start menu, so that’s right up here. And then the next thing you need is, “Well how do we run this application?” So, you need to go to the programs and then right here in the program menu, you should see Finale Data Collector. We’re gonna press that and that will bring up the Finale Data Collector software. And that’s about it. So if you need to close or get to the main menu, you can use the X. that does not exit the program. But I want you to notice this time as you go to start, you’re gonna see Finale Data Collector in the menu right here. So you can return and get right back to it. That’s the simple steps to get up and installing your mobile barcode scanner and running with the Finale Data Collector software.