

Receiving Shipments with Lot IDs

If you want to keep track of lots, batches, or expiration dates within Finale, it is optimal to be receiving shipments with lot IDs when the product arrive at the loading dock. This process is ideal using a barcode scanner to scan and record the lot id or lot number.
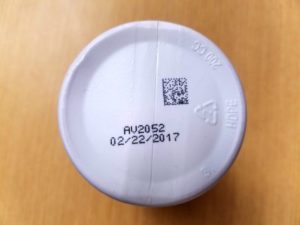
Bar code scanning is an easy way to track your business inventory or even keep tabs on office supplies. Many bar codes contain a lot number. A lot number is an ID that shows which batch or lot a specific product came from. This system makes it simple to follow up on a product and determine the supply house or factory it originated from for quality control or tracking purposes.
With this scenario, it is optimal to use a barcode scanner to record the lot ID. Compared to old-fashioned pencil and paper, the barcode scanner will greatly reduce the time to record the serial number and eliminated the high potential for human data entry error.
This video illustrates end-to-end how you would create the purchase order in Finale and then leverage the integrated mobile barcode scanner solution for receiving shipments with lot ids.
Once the lot numbers are recorded, Finale will provide you complete visibility for a specific product. You will have complete visibility such as :
- Who and when product 'ABC' with Lot '2020' was received in
- When this product was transferred to other locations
- Who bought this product with serial number '2020' and when the product was shipped
Video Transcription of Receiving Shipments with Lot IDs
Hey everyone, this is Sohni from Finale. In this video, we are going to go through the steps of receiving a purchase order and applying a lot identifier onto the incoming inventory. So, a lot identifier or lot ID for short is essentially used to uh document an identifier like a serial number, a batch number, or an expiry date on the items that you typically buy and receive and hold in your inventory. For this video in particular, we're going to use a standard lot, but if serialized inventory is something that you're interested in, be sure to check out the next video to learn a little bit more about that. The first thing off the bat that you'll want to do to be able to take advantage of this feature within Finale is visit your application settings. And specifically under the product tab, you're going to want to make sure that you've got this setting enabled here. We're going to scroll down and it's going to be right in this lot identifier section where it says use lot identifiers for tracking stock. We're going to go ahead and check that off. And we're going to stay with our default uh format here, which is going to be plain text. We are going to save that up.
Perfect. And then we are going to go ahead and jump right into receiving a purchase order. So, we'll navigate from here and open up this first order on our list from a supplier called Sterling. Now, as you may know by now, there are two important things that you're going to need to have in place before you go ahead and actually pull up the order on the scanner. The first is going to be that a destination has been specified on your purchase order. And so, what this means is that you are essentially telling Finale where that incoming inventory is going to and where it's going to be held. And you also will want to make sure that your order is sitting in a committed status so that it is eligible for you to go ahead and pull up on the device. Now, for the purpose of this example, we are going to go ahead and run a PDF copy of the order so that we have barcodes to scan. So, hitting this drop down, we're going to go and open up the purchase order manifest with barcode document. And you're going to see here that we've got two things to scan which are going to come in handy. We've got a barcode that corresponds to the order ID. And then we've got another barcode down here that corresponds to the item that we're going to be receiving. Now, in practice, whether or not you choose to run and print this documentation is totally up to you, but it certainly can be helpful during the receiving process, especially if your products are coming into you without a barcode already on them. If you print off that paperwork and you've got the barcode um as part of your documentation, it'll certainly be helpful because what you'll be able to do is scan right off that document using the device. All right, so let's jump right into it. From the home screen of the scanner, we are going to go into operation number three to receive. And I'm going to go ahead and scan that barcode. And the first prompt that we're going to get from the app here is to select a subloation that we want to receive this inventory into. So now if this were real life, what you'd be looking at doing here is essentially scanning your subloation barcode to set that location here on the device. For the purpose of this example, I'm going to go ahead and just click off that list and say that we are receiving this to our dock here. Perfect. Now, this is where we are going to begin to enter that product information into the app. You're what you're going to want to also do is to make sure that on your screen when you see this lot ID box here, you want to make sure that it is unlocked. The reason for it to be unlocked is so that the app will prompt you to enter this information in. If it's locked, what's going to happen is it's, you know, essentially going to get skipped over and you're just going to jump into entering the quantity of the items in this case here. So, we're going to unlock this box. And I'm going to go ahead and scan this candle barcode right off my paperwork here. Perfect. Now, this is also going to be an important piece of information for you to note, which is that you can scan the lot identifier right in uh to the app here instead of manually entering it in. Super important to keep in mind that this would be a barcode that is specific to what that lot is. This is not just the barcode that is coming on to your products. There's going to be a very important distinction here. If you do not have that barcode available to scan, that's certainly okay. What you'd be looking at doing is clicking into the field here and then going in and keying whatever that uh value should be. So, for this, I'm going to go ahead and do 10, 21, 20, 25, and 1. And then you're going to see that the last prompt here is to go ahead and enter in the quantity. So, if we were receiving all 100 of these candles under the same lot, I would go ahead and just press enter here, and then it would be a done deal. In real life, it may be the case that you're receiving the same item, but with multiple different lots, and that is absolutely something that you're able to handle and manage within Finale. So, let's say that that is going to be our reality in this example here. What I'm going to do is change the quantity here. And so we're going to say that the first 50 units that we're receiving are going under this lot. I'm going to press enter. And now you're going to see that our screen uh does not change, which is exactly what we want to see because now what we're going to do is basically start over and say, "Okay, great. We are going to scan in that vanilla oak candle." And now we'll have the ability to enter in a different lot. And so for this, we'll do 10, 21, 20, 25, and 2. And we'll go ahead and say that the remaining 50 units are going to be under that lot. Now, when I press enter here, you're going to see the message on the bottom left hand side go green. You can see that we've got 100 out of 100 units of this product on the PO. And we are essentially done with this receiving. So, we're going to go ahead and hit this main menu here. We're going to exit and we're going to sync this data back up to Finale's main system. And then what we're going to do is take a look at how all of this is transcribed in Finale's main UI. We're going to go ahead and refresh the browser.
And if you look over to the right here in this shipment section, we're going to see here that we've got a shipment that's now been received against this PO. We open it up here. And looking at the line item summary, in the farthest right hand side column, you're going to see uh this here where it says lot ID and it says mixed. Now, where the reason that it says mixed is just telling you that you've actually got more than one value in here. And so, if we are to hit this drop down arrow and look for more detail on this uh shipment, what we're going to see here is that the first 50 units on the first lot and then the last 50 units of the second lot were both received over at the dock here. Now we've got all of these details wrapped up together against this shipment of the PO and this is ready to go ahead and mark over as completed.
And there you have it. That's how to receive a purchase order and apply lot identifiers to your inventory.